
How to Pack a Skin-on-Frame Greenland Sea Kayak
Here is my newly added video showing how to pack a Greenland sea kayak.
Packing
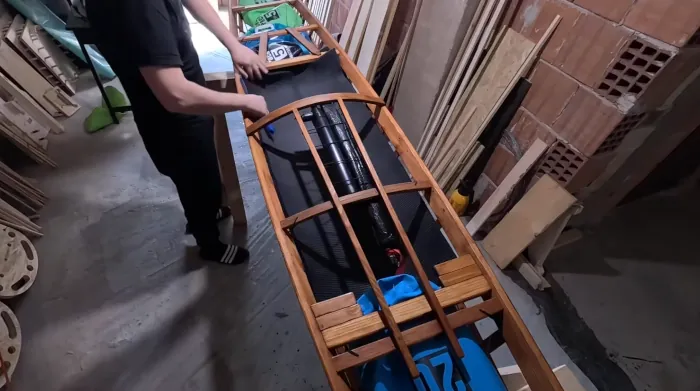
Besides the small volume of these kayaks, their frame takes up space too. For these reasons, in order to fit all of your gear, you should organize your gear well. Although I plan to build a touring skin-on-frame kayak with more gear space, I have longer trips in mind for it, but for a few-day trip I would really like to be able to do it with a Greenland kayak. After all, given how little time you have these days, I think these ‘one-to-few-day’ trips are the most common ones. With a minimalistic packing approach, Tetris packing, and a little bit of will, it should be possible. Some positive attitude music is welcome too!
No hatches
Greenland kayaks did not have hatches. Greenlandic people used their kayaks primarily for one-day trips for hunting purposes. Their gear was minimalistic and most of the hunting gear was on deck. Although it’s possible to make them, I’m not a fan of it, mostly because they do not look right to me on a skin-on-frame kayak.
Pull cords
One ‘popular’ solution among kayakers is to use a pull cord, although it can be a potential safety issue because you do not want ropes around your legs. However, I place a sitting pad over the front cord and one part of the cord goes on the outer side of the frame, between the skin and the ribs, so my legs are not in contact with this rope.
Front bag Check
Here I have my tent, sleeping bag, and inflatable sleeping pad. The plan is to use my sitting mat during paddling for sleeping too, plus a small inflatable pad with a sleeping bag over it. It should be enough, I think.
As can be seen in the video, I’m checking the front bag / pulling it out to see if it would fit. To fit nicely, I needed to pack my sleeping bag a little differently — I unrolled it a bit and rolled it together with the tent. Additionally, I tightened it with a strap so it takes up less volume.
Inside these end/stem bags, I find it better to have fluffier things like a tent, sleeping bag, and clothes. Harder, bulkier things can get stuck between the ribs, and your hand is not long enough, so… When pulling your bag toward the stem, if it starts to resist, don’t force it. You should remove your bag and repack it to take up less volume.
Bungees between fore deck stringers
This was not a part of a traditional Greenland kayak either. It’s something that I added in order to have something like a ‘day hatch’ for my bottle of water / snacks.
You have enough space for your legs during entering and exiting because they are at the sides. Once the kayak is skinned and finished, the bungees are not visible, so it’s a nice feature for me with the preserved Greenland kayak look. As I started to use water bags, I think this place will be useful for my bilge pump. Although I need to test if I can pull it out during sitting in a kayak because of its length and my body at the other side in a small cockpit, I think it can be done because of the bungees so I can turn it aside a little bit. After all, if it can’t be done, it will go on the deck because it does not take up too much space. Additionally, as shown in the video, I placed the tent poles here as it was a problem to fit them inside my 20L front dry bag.
Isserfik
The first deck beam behind the cockpit is the Isserfik — the place where you sit when getting in and out of the kayak. The Isserfik is slightly thicker and stronger than the rest of the deck beams as it needs to support your weight. It needs to be low enough for a better cockpit coaming angle — for getting in and out, and for easier back rolls. Once you pass this deck beam with your equipment, the rest is a little bit easier.
A 10-litre bag toward the stern should be reserved for clothes, one 5-litre bag for food (with the hope of catching a fish), and one 5-litre bag with essentials like a knife, first aid kit, headlamp, ropes, fire starter…
Cone shaped bags
I have managed to store one 5-litre bag of water and one 3-litre bag. I would like to increase that, although I don’t need much more than this for a weekend trip. Two litres more and I’d be good. My main water stock is behind the cockpit, as low as possible, which should help maintain maneuverability and stability. Note the empty spaces toward the bow and stern. There are cone-shaped kayak bags on the market and now I see that I definitely need one. This should unlock more storage space.
Clear deck
My goal was to keep the deck as clear as possible so I could retain stability and safety (reentry with a paddle / rolls). It doesn’t look bad for now. The deck will be reserved for my paddle, map and some small things eventually.
D’oh! I forgot to find space for my fishing rod. Do it again!